Commercial Roofing Products
RV Roof Install uses only top-quality commercial roofing on your RV or camper. We install a TPO membrane for your roof. TPO is thicker and stronger than typical RV roofing. Typical RV rubber roof detail procedures are to merely add more caulking on and around the transitions. Transitions are the AC units, skylights, vents, and plumbing vents.


Our Process
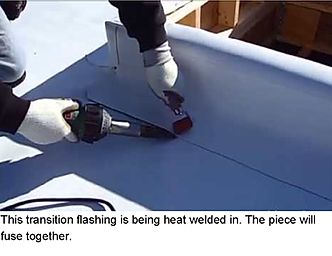
Typical RV roof systems rely solely on caulking to keep the roof watertight. Our system is heat welded. The pieces literally become one when welded, and will not separate or fail once fused together. This is a 60mil structured membrane.
Typical RV roofing is 30mil, which is thinner than 45mil. The RV grade roofing is also a fleece-backed product. The fleece is not as strong as a structured membrane against falling objects like branches. The structured membrane has a screen in it that makes it much stronger than fleece for better tensile strength.
Manufactures of RV's are concerned about weight, space, final cost, and sales price. With that being said, it stands to reason that these manufacturers will think of alternative ways to cut weight and costs to achieve the space and the sales price.
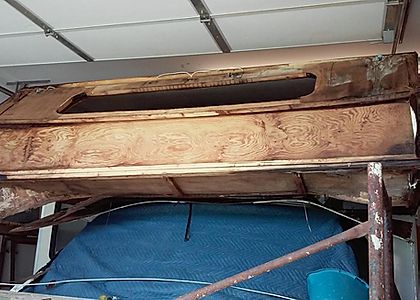
Almost all of the wood used in an RV is engineered. Engineered wood is a manmade product, not real-wood. Engineered wood is the byproducts of wood glued together. It could chip as you may see on a piece of OSB, or sawdust-like you may find on particleboard. This material is cheaper than real wood.
The concern as an owner is that the engineered wood, as a rule, will absorb far more moisture and water than real wood. We say as a rule because there are a few other products that far exceed the rule. None of which you will find in an RV.
The confusing language that seems to float around is Industry standard. When you hear those words, you are assuming that the industry is roofing, but that is not what they mean.
These standards are much less than what would be required on a commercial application, even though the inferior roofing is intended to do the same work and probably more. Commercial buildings do not travel 70 mph nor do they have to undergo all the humps bumps and jarring the RV does while traveling. Despite all the extra stress, these RV manufacturers still do a shoddy job on the RV roofs.
Basic construction procedures are that the roof trusses are screwed to an aluminum or metal wall frame. The sheathing, like we said above, are glued and stapled down to the trusses, and then the roofing is glued down to the roof decking. The normal roofing material is rubber, RV rubber, aka EPDM. There are a few manufacturers that will use TPO, but this will be an RV grade TPO not a commercial grade for flat roofs.
RV roofs are constructed by a truss system. A truss system is several pieces of wood that are glued, stapled, and gusseted together with metal brackets to make a rafter and ceiling member in one.
Engineered wood products are cheaper than real wood and also lighter. Remember, weight is a major factor in the RV world. These engineered systems will rot quickly and lose their strength if they get wet. They will absorb water and hold it, should they encounter a leak.
The summer heat raises humidity causing the resins and glues to fail and promote mold and mildew. That's why it is important to inspect your roof for leaks. Depending on how the leak travels, the moisture can cause delamination to the siding. We can fix this too.
The normal installation of rubber is to be glued to the roof deck. Protrusions are things that come through the roof like plumbing tubing, and refrigerator vents, cooking exhaust, roof vents, AC units, anything that comes through the roof is considered a protrusion.
The manufacturer simply applies a strip of butyl tape to these vents, screws these items to the roof, and then applies caulking around the screws and edges. They're counting on the caulking to keep you watertight. Caulking alone will fail. Probably sooner rather than later.
If you can't walk on it, then you cannot inspect it, can you? These manufacturers use 1/4-inch-thick roof deck sheathing. That is not nearly thick enough to walk on. To make workmanship even shoddier, they use 1-inch staples to fasten down the ¼-inch sheathing. If there is a need to walk on the roof, the manufacturer recommends one should place plywood on the roof so they can walk along the plywood.
That is extremely dangerous. We would not want a loose piece of plywood under our feet while on a roof. That's an accident waiting to happen. Staples work great and prevent splitting. We use a construction grade staple specifically designed for decking. Plus, we glue our decking down as well.
Many folks ask us about roof coatings. RV Roof Install LLC does not offer any coatings at all for a few reasons.
The first one being that coatings are not designed for RV roofs.
Manufacturers simply glue the roofing down, as we have already explained. Along the edges, the roofing is folded down over the sides, and there is a termination bar that is screwed over the roofing and into the top of the wall to terminate the roofing system.
However, what you do not see underneath is that the roofing is folded down over the wood deck. The wood deck is abruptly rough and will cause irritation in the roofing material. Over time, the edges will fail and allow moisture to enter the wall cavity on the inside of the outer portion of the wall.
This will cause mold, mildew and rot. The roofing needs to be protected from the edges. There should be a buffer piece to prevent the roofing from snagging or irritation. This is more detailed and more work for the RV manufacturers, and since it will fail after the warranty period is past, they don't worry about it.
RV Roof Install LLC worries about it and corrects this problem by gluing in buffer pieces on the edges to protect the roofing material.
RV Roof Install LLC offers pre-buy inspections, preventative maintenance inspections, and repairs to stave off roof replacement. We are experienced in recognizing vulnerable and common leak spots on roofs.
The caulking will work for a while, but this is not a proper long-term installation. Remember, though, the manufacturer only gives a couple of years on the warranty, so if it makes it past that, then the manufacturers are happy and you foot the bill for a new roof and unnecessary rot repairs.
In fact, these caulking procedures are not done on commercial buildings because it is doomed to fail. Then why is it acceptable to use on a moving vehicle? We don't believe it is.
RV manufacturers rely on caulking to keep water out. All corners, windows, roof vents, plumbing vents, lights, and anything screwed to the RV are all caulked. There are numerous kinds of caulking, but in most RV's the caulking of choice is silicone.
This is a flawed system. The only thing keeping water from getting under the AC is a ¾-inch foam gasket, and on the roof vents are just the caulking.
So now, when you travel the RV/camper will be flexing and vibrating. The AC unit may be vibrating from the operation of the compressor and the blower fan running. All the while undergoing extreme temperatures. Hot and cold and different climates as well as different altitudes.
All these conditions and elements will cause the caulking to expand and contract, loosen, dry out, and eventually fail. You have to admit all of the above is a lot to ask from caulking.
The caulking procedure is a doomed to fail procedure because when the roof has leaves, dust, and pollen on it, they turn to dirt, or more so like mulch. This debris will hold moisture against the protrusion edge. This moisture will break down the caulking as well, and this causes failure and leaks. It is very hard to remove the debris that gets stuck up under the AC unit because it is so close to the roof.
We have addressed the poor protrusion issues of vents and AC units, and such. Now, let's explore the other details they leave out costing, you more money.
Have you ever had an irritation on your skin from something that was constantly rubbing your skin, like the tight collar of a shirt? Or maybe certain undergarments.
The point is that it is very uncomfortable, and at the same time, it was subtle. If you had felt it immediately you wouldn't have worn it.
Roofing moves and flexes even when the vehicle is not traveling. Roofing will expand and contract with weather and temperature changes.
RV Roof Install corrects this defect by building curbs (as seen to the right) that keep the water and moisture out from the immediate underside of the protrusions. The curbs are heat welded to the main TPO roof membrane, making them literally one piece, just like welding metal. This cannot leak.
There is no caulking to fail. This takes more time to do correctly, so in order to save money, the manufacturers do not make curbs. We also fabricate pipe boot flashing as well to go over the plumbing vent pipes.
Another product we are proud to use is Tech Shield radiant barrier sheathing. You will have less heat and less workload on your AC unit by simply using this product when redecking the roof.
There is a difference in product use and design. Not all products are designed for the same use, maybe similar but not the same. For instance, almost everyone has heard of silicone as a sealant, but silicone is not to be used on rubber. It is not compatible and though it may appear to be sticking, it is not sealing.
GAF has proven to go above and beyond the requirements for testing their materials so as to supersede the competition. We keep up with most of the industries' newest products, upgrades, and failures to be able to pass this knowledge along to you as well as the advice of which product will best suit your application.
